Congratulations, you’ve sold out your latest group program and are gearing up to go LIVE with your most excited group of clients yet! Whether you have an exclusive group of 5 members or a large 500 person program, it’s important to nail down the structure of your group program ahead of time.
While you put the finishing touches on your curriculum outline, let’s dive into the details of a stellar live program and create your checklist for success.
Program Preparation
- Establish call times dependent on the group size
When selling a group program to a large number of people, make sure to have the day/time already established and well-promoted in your sales process. You don’t want to confuse buyers or end up with 50+ DMs requesting a change in the schedule, or worse, a refund.
However, if you’re working with a small group – think high-level mastermind – it’s an option to send out a day/time voting survey as this is more of a custom situation. We’ve done this over Typeform or SurveyMonkey. Oftentimes I’m guessing that the clients will prefer mornings, and the overwhelming majority vote comes in for afternoons.
- Create an AddEvent for the program run or for individual LIVE sessions
AddEvent.com is a service that allows for a one-click ‘add to calendar’ of your event or meeting. When creating the AddEvent page(s) you can title, describe, and add the Zoom details. That way when your students add this to their calendar they have all of the needed information in one place.
- Create a ‘show up’ reminder email sequence
Now that your call times are established, finalize an automated email sequence to remind students to join.
Ours looks something like this…
1. “See you tomorrow” email to remind everyone about the session and get your group members hyped about the training to come. Pro Tip: add a note at the bottom with a fun CTA like “turn your cameras on tomorrow if you want to be in a group photo” or “I’m bringing all my beverages, get ready to show me what you’re sipping on” to start building the culture of your program.
2. “See you in one hour” email with Zoom link, information on what students might need, and any last minute notes.
3. “Replay is live” email to send out when the replay has been successfully loaded into the student portal.
4. “Final day/thank you” email that sends with the last day’s replay + a note of gratitude.
Repeat this sequence for as many days as you have in your program, and be sure to input any variables like Zoom links/replay links if these change day by day.
Before Starting the Session
- Share to Instagram Stories
45-60 minutes prior to the session: Share a ‘hype and reminder’ slide. This might trigger FOMO in audience members who didn’t purchase, so have a plan in place to either onboard latecomers or have a script to politely direct them to an application or waitlist for the next cohort.
10 minutes prior to the session: Share an OOO slide that says something like, “I’m currently on a live call for [Title of Program]. If you’re a student, please check your program portal + email for today’s Zoom URL. I will return to Instagram at 2pm PST.”
- Check your inboxes
Do a check of your DM’s and email inbox to make sure there are no stragglers who are confused about time or links for that day. Have a prewritten script in your notes (or saved as a response in Instagram) with all of the day’s information so you can copy and paste quickly when these messages pop up.
*By now you might be noticing that a lot of our tips are about getting your students onto the LIVE sessions – YES! You might assume that because they paid for the program they’ll be committed to attending, and therefor paying attention to the “join info” emails/messages/portal access, etc.
But… People are busy, and you’d be surprised how many will come flying into your DMs 10 minutes into the session to say they don’t know where to be. We want to ensure they’re well prepped to be in the right place at the right time by over-communicating in the weeks prior.
If our students don’t attend LIVE they’re missing out on a huge part of the magic of a group program. Let’s make sure they get there and see the best results, community, and support.
During the Live Session
- Hit record
I know, I know, “Duh Shannon…” But I’d be remiss not to mention it! With the excitement of the LIVE element, I can’t tell you how many times I’ve almost forgotten to hit that little red button. This is one of your most crucial steps- so leave yourself a big sticky note on your screen, have team member at the ready to remind you, or set an alarm on your phone so you don’t forget.
Now, you can absolutely set your Zoom meeting to auto-record the moment you start it, which is a GREAT idea. However, bear in mind that if you’re going to give 5-10 minutes for latecomers to join and get situated, you might want to download & edit the recording (chop off that front portion) prior to uploading. OR add a note to the replay’s description about what minute mark the action starts.
I personally don’t love listening to, “Hi, hello, omg you live in Sweden, please mute yourselves, hi, how are you, drop your Instagram handles, wow it’s 6am for you, hi Helen!” for 10 minutes while I wait for the replay lesson to begin.
- Remind everyone to mute themselves
Before turning your camera on, or in those first few moments while students are joining the call, remind everyone to mute themselves and have your favorite playlist going to set the tone.
We love this Pre-Live Pump Up Playlist from our Bungalow Spotify.
*A note: if you’re like us and have a great number of parents in your student base, check that your playlist only has the clean version of songs to accommodate clients who listen with their kiddos nearby.
- Managing the chat and Q&A section
Those questions and hyped-up comments are going to roll in from the jump, so plan for natural pauses in your presentation where you can check the comment section and scan for important questions. Consider a short pause mid-way through each topic so you don’t fall behind on questions. We recommend going with the self-check method if you’re working solo.
If you have a team or access to a day-of helper (call in your VA for a couple hours, or even a friend), we have a preferred method for monitoring the chat…
- Live Google Doc
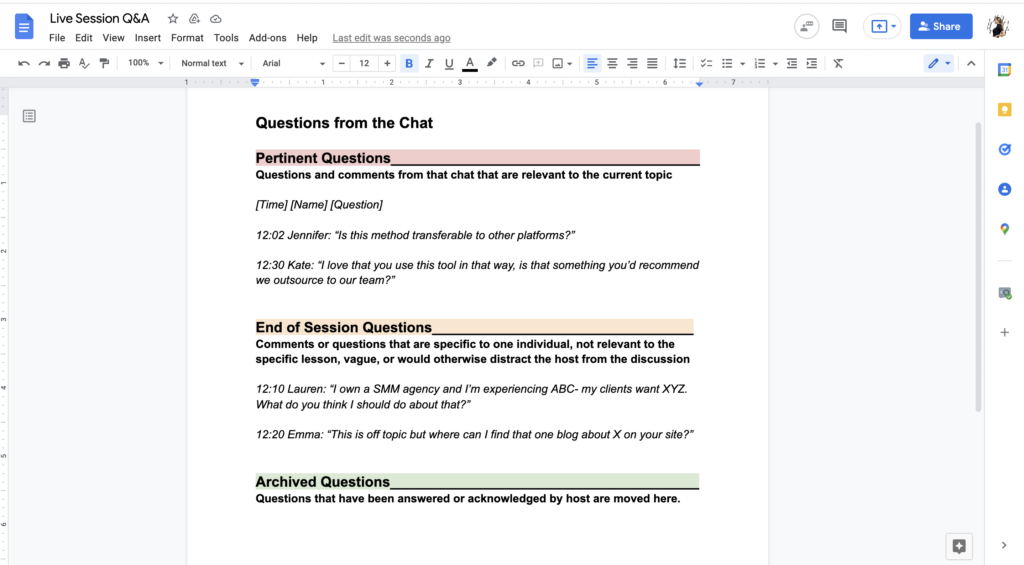
Utilize a Q&A document to keep track of all questions. Our team does this on a shared Google Doc. While I’m in presentation mode in the session, a team member is monitoring the live chat and adds new questions as they roll in.
This team member will separate the questions into three sections
1. Pertinent Questions [under the red line] – Those that need to be answered before moving on.
2. End of Session Questions [yellow line] – Those that can wait to be answered until the Q&A section.
3. Archived Questions [green line] – Once a question is addressed or acknowledged, paste it below this line.
Why not just delete it? A. To be able to reference what’s already been addressed throughout, B. For market research! These questions turn into invaluable insights to better your presentation for next time.
See our sample document below for a look at our BTS Q&A protocol.

Make sure you’ve briefed your chat monitor on your preferred method beforehand, as they need to be cognizant of the topic you’re discussing so that questions are archived at the appropriate time and nothing ends up falling through the cracks.
- Take screeenshots of the chat
Speaking of questions and comments, make sure your trusted team member is grabbing screenshots and screen recordings on their computer while monitoring the chat as these turn into social proof screenshots for future promotion.
If you’re working solo, take a few moments at the end of your zoom session after the recording is stopped to screen recording a long, slow scroll of the chat. This way you can watch it back and pause for individual screenshots of those great comments.
It’s immensely helpful to stack that social proof, but make sure you’re keeping it organized! Click here to see how our team keeps our social proof clean and tidy.
After the Session
- Upload the replay
Once your session ends and the recording processes, upload it to your preferred replay source. Options include Zoom itself, Google Drive, Amazon Web Services, Dropbox, WeTransfer, or a course hosting software – we use Kajabi.
We have a team member create a ‘module’ for each week, and a ‘lesson’ under that module for the replay, resources, homework, community access notes, and any housekeeping.
Environment
As with any meeting or video call, check your workspace to make sure it’s suitable to go live. A final check of environmental factors including…
- Set up your ring light or be close to a window with good natural light. Don’t forget to turn the temperature down if the ring light adds heat to the room.
- Clear the noise by silencing your phone, muting notifications to your computer, and putting a “Please Do Not Knock” note on your door so office neighbors or delivery people won’t disrupt your flow.
- Keep things running smoothly by doing a practice run of your monitors/presentation so you’re not searching for tabs while you have an audience watching.
- If you’re using your phone to go LIVE, don’t place it on your laptop. At some point your laptop’s fan might kick in making it very hard for your students to hear you.
Now that you have the structure of your group program, the stage is set to let your expertise shine!
Any questions about YOUR group program? I’m here with the free advice! Shoot me a DM on Instagram.
Related Posts
Check This Out
The Goods is your weekly download of all things business scaling and magnetic marketing, from exclusive content by Shannon to incredible guest contributors. We’ve got what you need.
